
How to Organize a Shipping Container for Maximum Storage Space
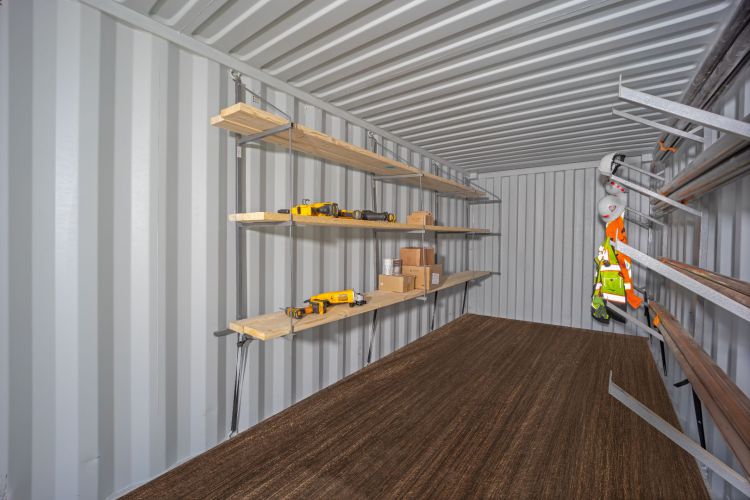
Learn how to organize a shipping container using storage zones, shelving, clear walkways and moisture protection to maximize usable space.
A shipping container can provide a large amount of secure storage, but poor organization can quickly make that space difficult to use. Boxes become hard to reach, equipment blocks the doors and valuable floor space is wasted.
A practical container layout makes stored items easier to find, protects them from damage and allows you to use more of the available space.
Follow these steps to organize your shipping container safely and efficiently.
1. Plan Your Storage Zones Before Loading
Divide the container into clearly defined zones based on what you plan to store.
Possible zones include:
- Tools and equipment
- Building materials
- Seasonal inventory
- Documents and office supplies
- Frequently collected orders
- Replacement parts
- Fragile goods
- Items requiring additional protection
Place frequently used items near the entrance. Equipment that is rarely needed can be stored toward the rear.
| Storage zone | Recommended position |
| Frequently collected goods | Near the doors |
| Heavy machinery | Low and close to a safe loading path |
| Seasonal inventory | Rear or upper shelving |
| Fragile products | Protected shelving |
| Documents and fabrics | Raised, dry storage |
| Tools and small parts | Labelled shelves or cabinets |
| Bulky equipment | Floor level with clear access |
Planning these zones before loading prevents you from repeatedly moving heavy items later.
2. Choose the Correct Container Size
Your organization system will work better when the container provides enough room for inventory and a safe walkway.
A 20ft shipping container can be suitable for tools, household goods and moderate business inventory.
Companies storing large quantities of equipment may need the additional capacity of a 40ft shipping container.
If you plan to install tall shelving or store bulky equipment, consider a High Cube container for additional vertical space.
Avoid choosing a unit that will be completely full from the beginning. Some unused capacity makes it easier to move, organize and access stored goods.
Use CargoVault’s shipping container dimensions guide to compare available sizes.
3. Maintain a Clear Central Walkway
Leave a clear walkway from the cargo doors to the back of the container. This allows you to reach stored items without unloading everything in front of them.
Do not place loose boxes, tools or equipment in the aisle. If possible, leave enough room to carry items safely or use a hand truck.
A clear walkway also makes it easier to:
- Inspect the floor and walls
- Reach every storage zone
- Identify signs of moisture
- Remove goods safely
- Respond during an emergency
- Check shelves and supports
Marking the walkway on the floor can help employees avoid gradually filling it with stock.
4. Use Shelving and Vertical Space
Stacking everything directly on the floor wastes valuable wall and vertical space. Strong shelving can help you store more while keeping items accessible.
Choose shelving designed to support the expected weight. Store lighter goods on higher shelves and heavy equipment closer to the floor.
Shelves should not block:
- Cargo doors
- Personnel doors
- Roll-up doors
- Ventilation openings
- Electrical equipment
- Lighting
- Emergency access
- The central walkway
Do not cut, drill or weld into the container structure without understanding how the modification may affect it. Use qualified installers for permanent shelving and structural work.
Explore CargoVault’s container accessories for storage, security and access products.
5. Store Heavy Items Low
Place heavy machinery, dense materials and large equipment on the lowest shelves or directly on suitable pallets.
This helps maintain stability and reduces the risk of heavy objects falling.
When storing heavy items:
- Confirm the shelf capacity
- Check the container floor
- Distribute weight appropriately
- Avoid unstable stacks
- Use suitable restraints
- Keep heavy goods away from weak packaging
- Maintain a safe removal path
Container payload capacity alone does not answer every floor-loading question. Narrow wheels or concentrated supports can place significant force on a small area.
Obtain professional guidance when storing unusually heavy machinery.
6. Protect Items From Moisture
Temperature changes can create condensation inside an unconditioned steel container. Cardboard boxes, furniture, documents, electronics and fabrics are particularly vulnerable.
Useful precautions include:
- Raising goods on pallets or shelves
- Leaving space between items and the walls
- Keeping ventilation openings clear
- Using sealed storage boxes
- Inspecting the roof and door seals
- Avoiding wet items
- Using suitable moisture-control products
- Adding insulation or climate control when necessary
Read CargoVault’s guide on preventing shipping container condensation for additional advice.
7. Use Suitable Storage Containers
Cardboard boxes may weaken when exposed to moisture or heavy stacking.
For long-term storage, consider:
- Durable plastic boxes
- Stackable containers
- Sealed document boxes
- Parts bins
- Tool cabinets
- Pallets
- Protective furniture covers
- Lockable cabinets
Use boxes of consistent sizes where possible. Uniform containers are easier to stack and organize.
Do not create stacks so high that items cannot be removed safely.
8. Label Everything Clearly
Use large, readable labels on boxes, shelves and storage zones. Labels should face the central aisle so they can be seen without moving other items.
A label may include:
- Item name
- Quantity
- Storage date
- Department or owner
- Shelf number
- Handling requirements
- Expiration or review date
Numbering shelves and maintaining a basic inventory list can save time, especially when the container holds business stock or construction equipment.
Your inventory can record:
| Inventory field | Example information |
| Item name | Replacement filters |
| Quantity | 24 |
| Location | Zone B, Shelf 3 |
| Date stored | Date received |
| Condition | New or used |
| Review date | Next inspection |
| Responsible person | Employee or department |
Update the inventory whenever goods enter or leave the container.
9. Improve Door Access
The cargo-door area should remain clear so the doors can open fully and goods can be removed safely.
Confirm:
- Exterior door clearance
- Interior loading space
- Ramp position
- Threshold height
- Hand-truck access
- Lighting near the entrance
- Safe door operation
For containers accessed frequently, an additional personnel or roll-up door may improve the layout.
CargoVault’s roll-up-door container guide explains the main access options.
10. Include Lighting and Ventilation
Good lighting makes labels, walkways and stored goods easier to see.
Depending on the application, consider:
- Battery-powered lighting
- Professionally installed electrical lighting
- Exterior security lights
- Motion-activated lights
- Emergency lighting
- Passive or powered ventilation
Electrical work should be completed by qualified professionals. Lights and cables should not interfere with shelves, doors or stored items.
11. Secure Valuable Inventory
Organization should form part of the security plan.
Consider:
- Heavy-duty locks
- A lockbox
- Lockable interior cabinets
- Security lighting
- Cameras
- Controlled key access
- An inventory sign-out system
- Regular door and lock inspections
Read CargoVault’s guide on how to secure a shipping container against theft.
12. Review the Layout Regularly
Storage requirements change over time. Inspect the container regularly and remove damaged packaging, unused materials and empty boxes.
During each inspection, check:
- Doors and locking points
- Shelves and supports
- Labels and inventory records
- Signs of moisture
- Floor condition
- Ventilation openings
- Interior lighting
- Clear access through the central aisle
- Unstable or overloaded stacks
- Evidence of pests
Regular inspections keep the space organized and help identify maintenance issues before they become serious.
Quick Container Organization Checklist
Before completing your setup, confirm that:
- Frequently used items are near the doors
- Heavy goods are stored low
- Shelves are stable and not overloaded
- A clear central walkway remains open
- Boxes are labelled and inventoried
- Moisture-sensitive items are protected
- Goods are raised from the floor
- Ventilation openings are clear
- Doors are not blocked
- Lighting is adequate
- Valuable items have additional security
- The layout can accommodate future stock
Frequently Asked Questions
What is the best layout for a shipping container?
Shelving along the walls with a clear central walkway works well for many storage applications. Frequently used goods should remain near the entrance.
How do I maximize vertical storage?
Use properly rated shelving and keep lighter items higher. High Cube containers can provide additional height for shelving and bulky goods.
Should boxes be stored directly on the floor?
Moisture-sensitive items should generally be raised using suitable pallets or shelving. This can improve airflow and protect goods from floor moisture.
How can I prevent condensation?
Provide ventilation, maintain airflow around stored goods, keep items off the floor and consider insulation or climate control for sensitive contents.
How often should the container be inspected?
Inspect it regularly and after severe weather. Businesses with frequently changing inventory may need more frequent checks.
Can shelving be attached to the container walls?
It may be possible, but drilling or welding can affect the container structure and weather resistance. Use an appropriate system and qualified installer.
Create a More Efficient Storage Space
A well-organized shipping container can make inventory management easier, improve access and help protect valuable belongings.
The best system combines the correct container size, defined storage zones, strong shelving, moisture protection, clear labels and regular inspections.
CargoVault offers container configurations for residential, commercial and construction storage. Browse 20ft containers, 40ft containers and High Cube containers, then request a custom quote to discuss your storage and delivery requirements.